What to do if you see a bill from apple.com/bill?
In the event that you can’t recognize the sum charged under the name of Apple.com/bill to your record, numerous buys may be gathered into one exchange. Once in a while, you probably won’t receive a different email affirmation of each buy. Likewise, a few charges show up on your proclamation two or three days after you’ve made the buys. What’s more, assuming you’ve given your iPhone or iPad to your children as of late, there are chances that they’ve made some in-application buys. Nonetheless, this is the very thing that you ought to do when gotten an “obscure installment” email.
What Should You Do When Received an Unknown Apple Payment.
- Audit your new buys or really take a look at your buy history in iTunes.
- Check your subscriptions.
- In the event that you are a coordinator of an Apple family share package, check for buys by different individuals.
- Check in the event that you see a new App Store or iTunes Store charge on your ledger. You can likewise check the Apple Support site and quest for this point.
On the off chance that you can’t distinguish the installment, you may be looking with a phishing mail (counterfeit messages that are attempting to fool you into sharing your own data, for example, an Apple ID secret phrase or Credit Card data.
Note: Ensure you DO NOT share any private data in that frame of mind prior to guaranteeing their authenticity.
On the off chance that there truly have been buys that you can’t perceive and you didn’t approve, ensure on the off chance that one of your children coincidentally didn’t make some in that frame of mind, without your assent. If so, you can demand an App store discount for youngsters’ unintentional in-application buys. This is the way to do that.
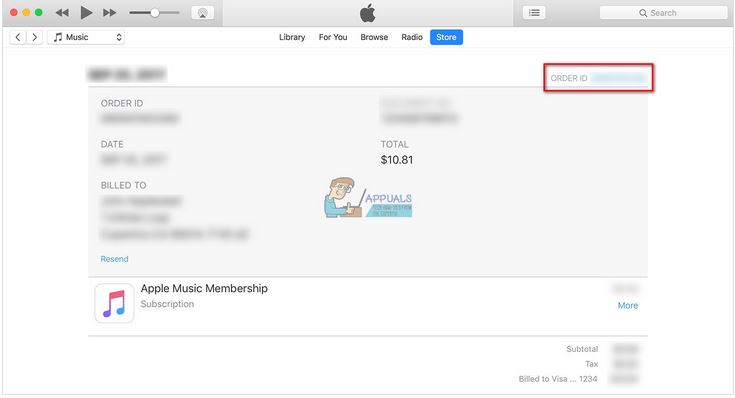
How to Find the Unknown Payment Order Number ?
To send the request, you want to find your obscure buy request number (request ID). There are 2 methods for getting it.
Via Email
- Look for “iTunes Store” in your Apple-related email inbox. To limit it down you can likewise look for Apple’s particular mail: “do_not_reply@itunes.com.”
- Sort through the list items to find the ones you need. As an easy route, at the lower part of each mail, you can see a connection to your Purchase History. It will take you straightforwardly to that part of the iTunes Store.
- When you find the got email, duplicate the request number. You can track down it on the upper right of the email (After “Request ID”). You will require that number for sending the solicitation.
Via the iTunes Store
Assuming that you have been erasing your receipts to clear out your email, you can utilize the iTunes Store to get to the whole buy history you’ve made.
- Launch iTunes on your computer.
- Go to the iTunes Store and Snap Account the menu bar.
- Starting from the drop menu pick View My Account.
- Presently, Enter your Apple ID Secret Key, and you will get to your record page.
- Look down to uncover the sub-segment Purchase History
- Click on See All, situated on the option to get the full list.
- Here you can not look through your set of experiences (like you can in your email inbox). Nonetheless, leap to a particular month and year to track down the obscure buy.
- When you found the unapproved buy, copy the request number.
Note: In the event that the request number isn’t no doubt apparent on the table (assuming it closes with an ellipsis), click the bolt to one side of the Now you can see the full request number.
Submit the Request
When you have the unknown installment request number, you can present the solicitation.
Go to Apple’s structure for sending a request. (you can track down it at the accompanying connection)
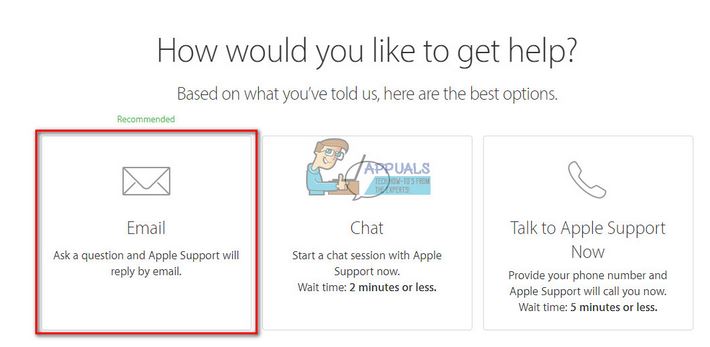
- At the point when the site loads up, Pick the button for Email. It will take you to a structure where you can enter your contact data and explicit details.
Enter the obscure buy request number in the applicable field (If you have more than 1 obscure buy, you could have to finish more demands). - In the detail segment, type “Discount for In-App Purchases made by a minor.”
- When you finish the form, submit the request.
- After you’ve sent the request, you ought to hang tight for Apple’s response. They will ideally tell you the situation with your discount pretty fast.
How to Prevent Future Unknown Purchases:
To prevent any future obscure buys ensure you do the accompanying strategies.
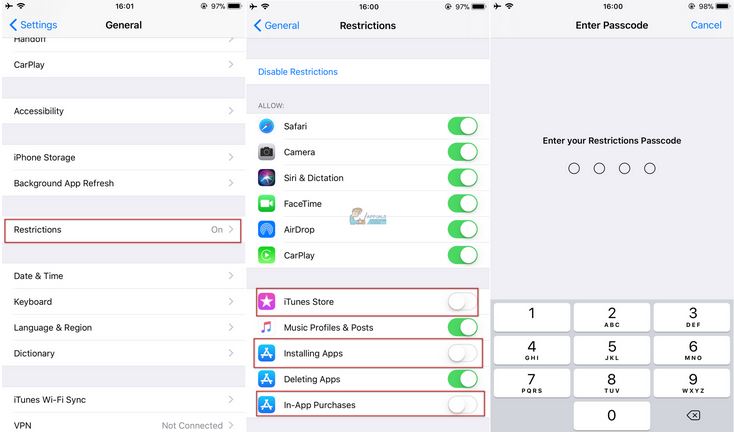
Turn off In-App Purchases
- On your iDevice, go to Settings, tap on General and pick Restrictions.
- Tap Enable Restrictions (if it isn’t already turned on).
- Make a limitations password, and reemerge your password for affirmation. Here you can pick a password that is unique in relation to the one you use it for opening your gadget.
Note: On the off chance that you forget your password, you should eradicate your gadget and set it up as another one.
- When you finish up with the password, look down to the In-App Purchases switch and impair it. In the event that you don’t use In-App Purchases, you can totally switch off the iTunes Store, Installing Apps, iBooks Store, and In-App Purchases.
How to Set a Password Requirement for Each Download :
- Go to Settings, tap on your Apple ID (at the highest point of the settings rundown), and open iTunes and App Store.
- Open Password Settings (in the event that you have Face ID or Touch ID empowered for buys, you won’t see this menu).
- In the Purchases and In-App Purchases area pick Always Require.
- In the Free Downloads segment, turn on the switch Require Password.
- When required, enter your password and tap OK.
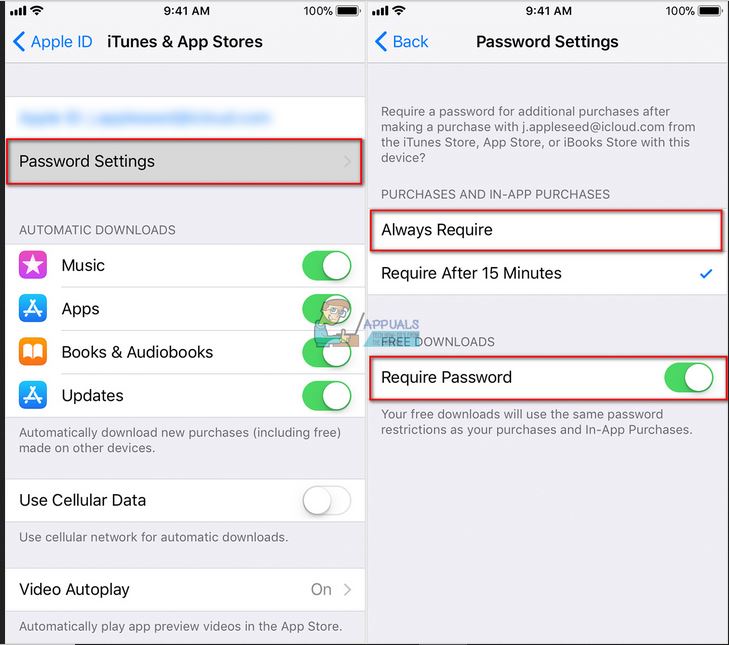
Presently, for each application download, you should enter your secret phrase.
Activate.apple.com – Activate Apple TV
You can subscribe to Apple TV Plus at tv.apple.com. Or subscribe in the Apple TV application on an Apple device, Smart TV, or Streaming device that’s compatible with the Apple TV application. Learn which streaming devices are compatible.